


Wanna know how to make a digital flatlay? Fill up your cup, sit down and take notes. LET'S DO THIS!
*To learn a cool trick for using digital flatlays, Read this.

Pic of apps
Android users. Eraser and photo layer are your go to for flat lays in app.
Download them BOTH. then surf Instagram for your favorite items. My favorite is River babe threads. We rep for her and she puts most of her items on a white clear back ground which makes it easier for this app.
I even Google image things when I can't find any.

THEN you open eraser first. (Be sure to save all images you could possibly want for a flat lay at that time so you aren't doing these steps over and over)

First you'll crop down your image. Make it as tight as possible. You'll thank me later.

Simply move those arrows in but be sure not to cut off any of the item.

Next step you'll need to adjust your cursor up top. No idea why its preset is so far away. Push it all the way to the left and it'll be flush.

You'll also want to adjust the bottom button slightly larger to get this done quickly.
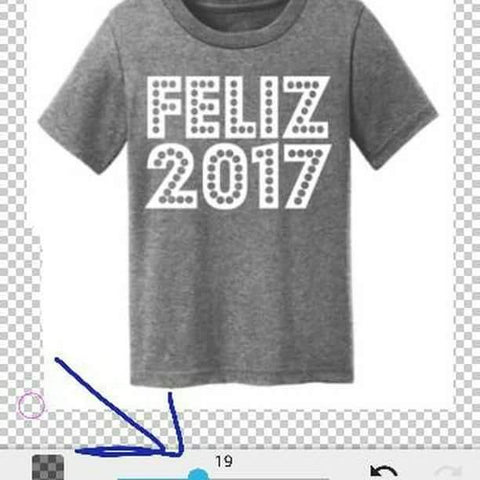
Next scribble out as tightly as you can. But so so carefully. I've got giant fingers and mess up all the time. Make sure to do small strokes. So when you mess up and need to undo-it isn't the entire thing you've done its only one small stroke.
(you can zoom in "pinch" and tighten up the eraser)

Try and leave shadows like this. It brings in depth and makes it look like its really there with you.

If you mess up,the undo button is right there.

Even this image can be used multiple times. Ive cropped a bit and diminish the rest to get each color alone. That way I've got plenty of accessories ready to go for my flat lays.

Next t'll show you a "clean up screen,"always click #5. It'll tighten up your scribble job. And then simply save.

See how I've left plenty of room around that beautiful shadow. ![]() 😍
😍![]() 👌
👌
Now that you've cropped shaved and saved all if your items- its time to move on to photo layers. Be sure to always have a good white background saved
It'll ask you to load the back ground image first and choose a size. The free option allows you to make a window closer to the size of an Instagram square. Do that.
Next you'll add photos. BE SURE if you want to layer the photos on top of one another that you add the photo you want on bottom first. IT BUILDS depth for you. SO if you want a bracelet in top of a t-shirt but you add that photo first- the t-shirt will actually cover up your bracelet. Hope that makes sense.
I tend to add my shoes and pants first then build from there just to have the option to layer if possible.
You can crop and tighten the image. Once added DO NOT adjust the size just yet.

Add photos from your eraser folder

Whoops. Those reds don't match. Bottom right is a remove button

Okay these are all the items I want. Messy. Lets start moving these around and adjusting sizes. A pair of shades wouldn't be bigger than a shirt. Etc.

Make the shadows make sense by turning the photo.

Getting better. Lets spread it out a bit.

If you still feel there's some empty space try adding shapes. Or quotes (I use rhonna)or even adding the shop names. Here's what I did using Snapseed editing app

Then just remember which items belong to what shop. The shades hat and shirt are riverbabethreads. Kicks are converse. And the jeans are babyskysdenimsupplu

It gets a bit addictive, as you can see! :)

Leave a comment